Structure of Austenitic SS Bellows & F6NM Martensitic SS Flanges after Welding (Part Two)
Observed the microstructure of the heat-affected zone, fusion zone and weld metal zone on the F6NM martensite flange side, as shown in Figure 5. In the as-welded state, the base metal and weld metal of the F6NM martensite flange side (Figure 5a) were well formed, and there were a small number of black needles and dots in the weld metal area and fusion zone. It may be that the molten martensite base metal has a diluting effect on the content of alloying elements in the weld metal, making the content of the austenite forming elements in the welding seam reduced, so that a martensite structure may appear in the weld metal. The black needles in the weld metal area and fusion zone on the F6NM martensite flange side (Figure 5b) at the PWHT state have disappeared; the original martensite was transformed into austenite, and the grain size was the same. The distribution was more uniform than that in the as-welded state. There were no obvious changes for the crystal grains for the base material F6NM in the heat-affected zone at the as-weld state and PWHT state.
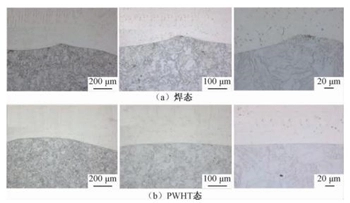
Figure 5 The microstructure of the heat affected zone, fusion zone and weld metal zone for F6NM martensite flange sides
Generally, the martensite structure appears in the weld metal area and the fusion zone in the welding process, which will deteriorate the quality of the joint welding to a certain extent, and cracks may occur in severe cases. The post-weld heat treatment was conducted to reduce the austenite becoming martensitization, decrease the hardness of martensite, eliminate the welding stress concentration, and avoid the occurrence of cracks.
2.2 The analysis of the hardness of the welding area
Samples were taken for the hardness of the heat-affected zone, fusion zone and weld metal zone of the F6NM martensite flange side was measured at angles of 60°, 180° and 300°. The Vickers hardness distribution is shown in Figure 6. It can be seen from Figure 6 that the hardness of the base material of the F6NM martensite flange side had no change in the as-welded state and the PWHT state, which was about HVa1292. The average hardness of the weld metal in the welded state was about HVa170, which was slightly higher than that of the PWHT state. The main reason was that there were a small amount of black needles and dots in the weld metal area in the as-welded state. These black needles and dots were martensitic, and the hardness of the martensitic structure was higher than that of the austenite structure. After the post heat treatment, the black needles and dots disappeared. The martensite structure was reduced, and the hardness was reduced. In the post-weld heat treatment state, the average hardness of the heat-affected zone was about HVa1 360, which was higher than the hardness of the as-welded state. The main reason was that after the post-weld heat treatment, the austenite that may exist in the heat-affected zone was transformed into martensite; the grain distribution of the HAZ zone was more uniform and the hardness became better.
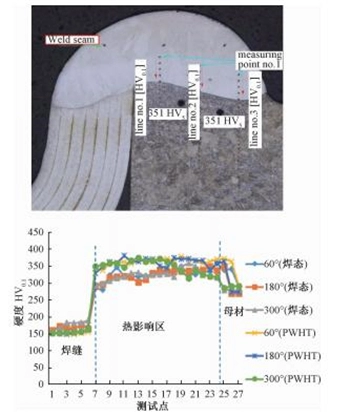
Figure 6 The hardness distribution of the F6NM Martensite flange side
2.3 The analysis of structure and hardness of bellows
In order to understand the influence of welding and heat treatment on the mechanical properties of the bellows, the internal structure and hardness of the 7th expansion joint in the middle of the bellows were analyzed. As shown in Figure 7, the internal structure of the bellows in the two states was the same. Measured the hardness of the root, middle and top of the 7th expansion joint of the bellows. pos.1 is the root of the expansion joint, pos. 2 the middle, and pos. 3 the top.
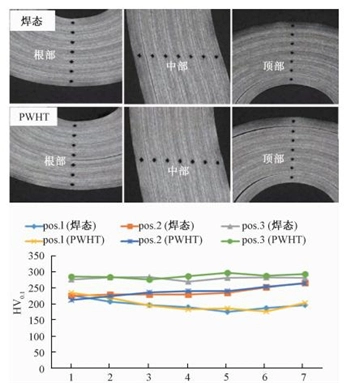
Figure 7 The microstructure and hardness distribution of 7th expansion joints of bellows
It can be seen from Figure 7 that the hardness curves of the root, middle and top of the bellows in the as-welded and PWHT state were almost the same, which showed that the hardness of the bellows in the as-welded state and PWHT state were almost the same, indicating the post-weld heat treatment did not affect the hardness and structure of the bellows.
2.4 The analysis of residual stress of bellows components
The 7th expansion joint was in the middle of the bellows assembly end, which was less affected by welding, and could best represent the elasticity and other mechanical properties of the bellows. Measured the circumferential and longitudinal residual stresses of the 7th expansion joints at 0° and 180° of the bellows assembly before and after cutting the bellows assembly in the as-welded state and the PWHT state (Table 2). It can be seen from Table 2 that in the as-welded state and PWHT state, the longitudinal residual compressive stress of the bellows assembly after cutting was greater at angles 0° and 180° than that before the cutting, mainly because after cutting bellows assembly, the stress which was restrained by the component was released. The residual stress of the 7th expansion joint before and after the cutting at the PWHT state was greatly reduced at angles 0° and 180° compared with that before heat treatment, with a decrease up to 2/3, indicating that the uneven deformation of the metal was eliminated after the heat treatment. The stress caused by uneven deformation was reduced and eliminated.
Table 2 The residual stress of 7th expansion joint of bellows/MPa

Figure 5 The microstructure of the heat affected zone, fusion zone and weld metal zone for F6NM martensite flange sides
Generally, the martensite structure appears in the weld metal area and the fusion zone in the welding process, which will deteriorate the quality of the joint welding to a certain extent, and cracks may occur in severe cases. The post-weld heat treatment was conducted to reduce the austenite becoming martensitization, decrease the hardness of martensite, eliminate the welding stress concentration, and avoid the occurrence of cracks.
2.2 The analysis of the hardness of the welding area
Samples were taken for the hardness of the heat-affected zone, fusion zone and weld metal zone of the F6NM martensite flange side was measured at angles of 60°, 180° and 300°. The Vickers hardness distribution is shown in Figure 6. It can be seen from Figure 6 that the hardness of the base material of the F6NM martensite flange side had no change in the as-welded state and the PWHT state, which was about HVa1292. The average hardness of the weld metal in the welded state was about HVa170, which was slightly higher than that of the PWHT state. The main reason was that there were a small amount of black needles and dots in the weld metal area in the as-welded state. These black needles and dots were martensitic, and the hardness of the martensitic structure was higher than that of the austenite structure. After the post heat treatment, the black needles and dots disappeared. The martensite structure was reduced, and the hardness was reduced. In the post-weld heat treatment state, the average hardness of the heat-affected zone was about HVa1 360, which was higher than the hardness of the as-welded state. The main reason was that after the post-weld heat treatment, the austenite that may exist in the heat-affected zone was transformed into martensite; the grain distribution of the HAZ zone was more uniform and the hardness became better.

Figure 6 The hardness distribution of the F6NM Martensite flange side
2.3 The analysis of structure and hardness of bellows
In order to understand the influence of welding and heat treatment on the mechanical properties of the bellows, the internal structure and hardness of the 7th expansion joint in the middle of the bellows were analyzed. As shown in Figure 7, the internal structure of the bellows in the two states was the same. Measured the hardness of the root, middle and top of the 7th expansion joint of the bellows. pos.1 is the root of the expansion joint, pos. 2 the middle, and pos. 3 the top.

Figure 7 The microstructure and hardness distribution of 7th expansion joints of bellows
It can be seen from Figure 7 that the hardness curves of the root, middle and top of the bellows in the as-welded and PWHT state were almost the same, which showed that the hardness of the bellows in the as-welded state and PWHT state were almost the same, indicating the post-weld heat treatment did not affect the hardness and structure of the bellows.
2.4 The analysis of residual stress of bellows components
The 7th expansion joint was in the middle of the bellows assembly end, which was less affected by welding, and could best represent the elasticity and other mechanical properties of the bellows. Measured the circumferential and longitudinal residual stresses of the 7th expansion joints at 0° and 180° of the bellows assembly before and after cutting the bellows assembly in the as-welded state and the PWHT state (Table 2). It can be seen from Table 2 that in the as-welded state and PWHT state, the longitudinal residual compressive stress of the bellows assembly after cutting was greater at angles 0° and 180° than that before the cutting, mainly because after cutting bellows assembly, the stress which was restrained by the component was released. The residual stress of the 7th expansion joint before and after the cutting at the PWHT state was greatly reduced at angles 0° and 180° compared with that before heat treatment, with a decrease up to 2/3, indicating that the uneven deformation of the metal was eliminated after the heat treatment. The stress caused by uneven deformation was reduced and eliminated.
Table 2 The residual stress of 7th expansion joint of bellows/MPa
| Longitudinal directions | Circumferential directions | ||||
| Locations | As-welded states | Heat treatment states after welding | As-welded states | Heat treatment states after welding | |
| Before cutting | 0° | -94 | - 28 | -83 | - 39 |
| 180° | -42 | -14 | 6 | 4 | |
| After cutting | 0° | -123 | -41 | -73 | -39 |
| 180° | -124 | -30 | -62 | -45 | |
3. Conclusion
(1) After the 316Ti austenitic stainless steel bellows and the F6NM martensitic stainless steel flange were welded in the as-welded state and the post-weld heat treatment state, the welding seams were well formed, without cracks and other obvious defects.
(2) In the as-welded state, there were a small amount of black needles in the weld metal area on the side of the 316Ti bellows, which was mainly due to the martensitization of the weld metal in the welding process; after heat treatment, the black needle martensite was transformed into austenite. Crystal grain sizes of weld metal and HAZ were the same, and their distribution was more uniform than that in the welded state.
(3) In the as-welded state, there were a small amount of black needles and dots in the side seam's metal area and fusion zone of the F6NM martensite flange, mainly because the molten martensite base metal diluted the content of alloying elements in the weld metal. After heat treatment, the black needle-like martensite was transformed into austenite, and the weld metal and HAZ crystal grains were more evenly distributed than that in the as-welded state. There was no obvious change in the grain size of the base material in the affected zone of F6NM flange side in the as-welded state and post-weld heat treatment state.
(4) In the as-welded and post-weld heat treatment states, the hardness of the base material on the side of the F6NM martensite flange had no change, and the hardness was about HV0.1292. The average hardness of the weld metal in the as-welded state was about HV0.1170, which was slightly higher than the hardness of the weld metal in the PWHT state. The average hardness of the heat-affected zone in the post-weld heat treatment state was about HV0.1360, which was higher than the hardness in the welded state.
(5) The internal structure and hardness of the 7th expansion joint of the bellows were almost the same in the as-welded state and the PWHT state, and the heat treatment did not affect on the internal structure and hardness of the bellows.
(6) The post-weld heat treatment could greatly reduce the residual stress of the 7th expansion joints of the bellows.
Related News
- Installation of Main Bolts for Lap Joint Flange in High-Temperature Gas-Cooled Reactors
- Structural Design and Finite Element Analysis of Anchor Flanges
- Key Welding Technology for High-Neck Flange and Steel Pipe Joints
- The Design and Calculation of Stamped Lap Joint Flanges
- Development of Manufacturing Large Anchor Flanges
- Hardfacing the Inner Surface of Long-Neck Flanges Using CO₂ Gas-Shielded Welding
- UHV High-Neck Flange Welding
- Application of High-Neck Flange to UHV Steel Pipe Tower
- Analysis of the Cracking Cause of High-Neck Flanges
- Anchor Flanges for the East-West Gas Transmission Project
