Research on the Processing Technology of SS316L Flanges
On this page
During the initial trial cutting of SS316L flanges, problems such as low efficiency, inability to mass-produce, and precision not meeting standards were identified. The causes of these problems were analyzed, and effective measures, including designing special fixtures and optimizing processing technology, were taken to solve them and improve the processing efficiency and product qualification rate of SS316L flanges. Flanges are required for the connection between two bearings and equipment. Currently, one of the main connection methods in pipeline construction is flange connection, which offers advantages such as large pressure-bearing capacity and easy disassembly. To study the processing technology of SS316L flanges, flange parts of corresponding models of reducers were selected. During actual processing, it was found that certain aspects did not meet the requirements of the drawings. Based on this, the problems in the actual processing were analyzed, and the processing technology was optimized to ensure the quality of flange processing.
The problem in SS316L flanges are common, with a chemical composition that includes molybdenum, nickel, chromium, sulfur, phosphorus, manganese, silicon, and carbon. According to the processing requirements, a 55mm × 20mm round bar is used as the blank. The material is characterized by high-temperature resistance, corrosion resistance, high strength, and good cutting performance, making it widely used in mechanical equipment. Flange processing elements primarily include drilling, boring, milling planes, and turning outer circles, mainly encompassing milling, turning, and other machining operations. On the CNC lathe, the right side's Ø52mm and 434mm outer circle are turned, followed by the processing of the middle 15.68mm and 28.3mm holes and the 433mm outer circle. Using the vertical machining center, the R1.7 arc groove, 4-4.5mm hole, Ø12.2mm hole, Ø24.0mm hole, and right side bevel are processed. In the first trial cutting, three-jaw chucks were used as fixtures in the machining center and CNC lathe. The CNC lathe processed the outer circle and steps on the right side, followed by the outer circle and inner hole on the left side. When using the three-jaw chuck of the machining center, the outer circle position on the right side was clamped, arc groove milling and drilling were performed, and then the reverse side was clamped to mill the inclined surface and hole. Finally, the inner groove was processed on the CNC lathe. Based on the above processing technology, the first trial cutting test was carried out. The results showed that the roughness of the inner hole and arc surface on the left side was unsatisfactory, and the completeness of some arc processing was insufficient. The angle between some holes and the axis centerline was insufficient, and the spatial position of the right inclined surface was unsatisfactory. Additionally, the processing time was long, and the processing efficiency was low.
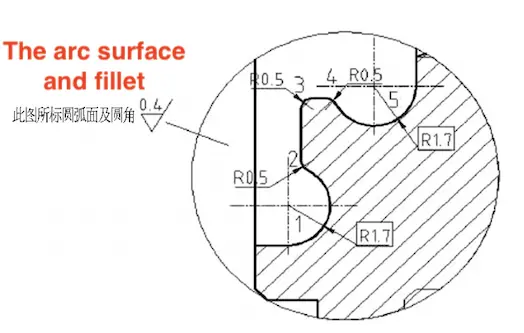
According to the first trial cutting results, as shown in the figure, there are three arc segments on the left side of the part, including R0.5 and two R1.7 segments. The R0.5 arc at position 3 is processed by a boring tool in the CNC lathe; the R1.7 arc groove at position 1 is milled by a ball-head milling cutter in the machining center, and the R1.7 arc at position 5 is processed by an arc inner groove cutter in the CNC lathe. During processing, the R0.5 arc grooves at positions 2 and 4 were not involved, so the R0.5 arcs at these two positions were not processed completely. The R1.7 arcs at the two positions were processed on the CNC lathe and the machining center respectively, resulting in tool marks and burrs. However, no corresponding treatment was made, leading to excessive roughness. Additionally, the right-side hole and bevel are mainly processed in the machining center, with the angle between the hole and the axis being 12°. The relationship between the bevel and the hole is spatially correlated. The three-jaw chuck is installed on the workbench, and the installation position of the part cannot be consistently determined. Additionally, the three-jaw hydraulic chuck has been used for too long, causing it to wear out and gradually form a bell-mouth shape. The three jaws gradually deviate from the center of the machine tool spindle, increasing the centering error and affecting the shape and position tolerance of the workpiece, thereby reducing processing accuracy. Furthermore, using the above processing technology, it takes 20 minutes to complete one part, which is inefficient and unprofitable, mainly due to the numerous part clamping times and scattered processing procedures.

Left arc roughness

Left arc roughness
Based on the analysis of the above problems, the processing technology for SS316L flanges is optimized by incorporating additional finishing processes. Traditionally, the inner hole is processed on the CNC lathe, followed by milling the arc groove in the machining center, and finally processing the arc inner groove on the CNC lathe. In this optimized process, a finishing boring tool is added to the CNC lathe for final operations. This technology ensures that all arc surfaces are finished to meet standard roughness requirements. Additionally, a special fixture is designed. For the CNC lathe fixture, three copper blocks are welded to the front end of the soft jaws of the three-jaw chuck, forming a circular arc step shape through self-boring. During processing, one side of the part can be quickly aligned with the step for accurate positioning. The machining center fixture design consists of a workbench, screws, base plate, locating pins, T-screws, flange parts, support seats, and other components. The fixture base plate is installed on the workbench of the machining center and fixed with a T-slot, while the support seat ensures the spatial positioning of the parts. The locating pin fixes the position during the clamping process, followed by tightening the remaining screws. During processing, the fixing pin is removed, and the 12° bevel is milled first, followed by milling the hole. The design of a special fixture effectively improves processing efficiency.
In the past, there were certain problems in the processing technology of SS316L flanges, and the processing accuracy and efficiency were not ideal. The causes of these problems were analyzed, and corresponding improvements and optimizations to the processing technology were made. Processing accuracy was improved through fine processing, and processing efficiency was enhanced by designing special fixtures.
Next: Analyzing the Corrosion of Blind flanges
Previous: Flanges Formed by Bending
Related News
- Installation of Main Bolts for Lap Joint Flange in High-Temperature Gas-Cooled Reactors
- Structural Design and Finite Element Analysis of Anchor Flanges
- Key Welding Technology for High-Neck Flange and Steel Pipe Joints
- The Design and Calculation of Stamped Lap Joint Flanges
- Development of Manufacturing Large Anchor Flanges
- Hardfacing the Inner Surface of Long-Neck Flanges Using CO₂ Gas-Shielded Welding
- UHV High-Neck Flange Welding
- Application of High-Neck Flange to UHV Steel Pipe Tower
- Analysis of the Cracking Cause of High-Neck Flanges
- Anchor Flanges for the East-West Gas Transmission Project
