Research on the Manufacturing Process of Large Flanges
With the advancement of science and technology, modern petrochemical enterprises are developing in the direction of large scale and complication. The large-scale equipment has brought opportunities to the manufacturer, but it has also brought greater challenges. In the manufacturing process of large flanges, because the flange blank is annular, if the traditional half ring processing with too many parts is adopted, it will inevitably increase the welding workload, and the deformation caused by welding will also increase; if the half ring processing with a few parts is adopted, the raw materials will be wasted, resulting in certain economic losses. Taking a company as an example, the company has optimized the manufacturing process of large flanges, especially for slip-on flanges with a nominal diameter of not less than 1000 mm. The company has summed up a series of optimized production processes to meet the needs of production processes. A slip-on flange made from Q345R is taken as an example to explain the processes of blanking, rolling, welding, shaping, heat treatment and other processes.
1. Cutting processes
The blanking process is the first process, which is directly related to the success or failure of manufacturing flanges. The fabrication process of the flange is shown in Figure 1.

Figure 1 The manufacturing process of the flange
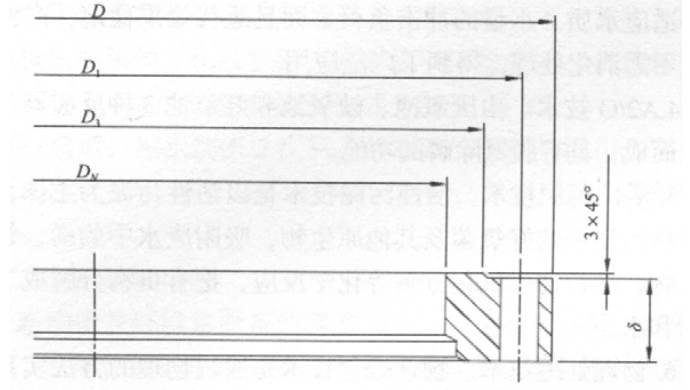
1. The specific parameters of the flange are: DN being 1 000 mm, D 1 130 mm, δ 40 mm. A cutting allowance of 10 mm should be preserved in the inner and outer diameter directions of flange blanking, and a cutting allowance of 6mm should be preserved in the thickness direction.
2. Regarding the determination of the blanking length L, practice shows that L equals to the diameter of the flange times π, that is, L = π(DN + D1) / 2, and we can know that L = π (1000 + 1130) / 2 = 3345 mm.
It can be seen from this that the blanking size of the slats is L = 3 345 mm, B = 85 mm and thickness = 49 mm. The dimensions of the slat blanking are shown in Figure 2.

Figure 2 Dimensions of slat blanking
2. Rolling processes
There are two types of the rolling process, that is, cold rolling and hot rolling. The company usually adopts cold rolling with B reaching 100mm. The equipment used for rolling is a plate rolling machine, and the precision should be continuously adjusted in the rolling process to achieve the required roundness. Typically, the diametrical error does not exceed 3mm.
3. Welding processes
In the welding process, although there is only one welding junction, considering the welding deformation and welding quality, the company adopts the X-shaped groove. First, the annular blank is fixed horizontally on the gantry fixture platform, and then the groove processing is carried out. First, the groove is cut by flame and then ground with a grinder. The groove surface is required to be smooth, flat, without obvious grooves, and the groove surface and both sides are free from defects such as iron oxide, impurities, moisture, oil stains and delamination.
The selection of the appropriate welding method directly affects the degree of deformation caused by welding due to the great thickness of the blank. The company chooses manual welding for symmetrical welding on both sides. Improper welding may still cause post-weld deformation. For example, one side of the X groove is welded first, and then the other side is welded; when the first side is welded first, the structural rigidity is relatively small and the welding deformation is great. When the reverse side is welded, the previous welding has been formed, and the structural rigidity is greatly increased. The deformation caused by welding is smaller than that of the front surface. Although the deformation directions of the two are opposite, they cannot be completely offset, and the deformation direction of the first surface is still retained. The number of welding layers is determined according to the thickness of the welding workpiece and the diameter of the electrode. The workpiece has a thickness of 50mm, and it is divided into 10 layers. There are five layers on each side, and the welding adopts positive and negative symmetrical welding. Hammer the welding seam several times after each layer is welded. After the welding seam is completely cooled, remove the fixture to eliminate welding stress as much as possible.
After the welding is completed, a comprehensive RT or UT inspection shall be carried out according to the requirements of JN4700. Since the welding part is a part of the stress concentration and where the flange strength is relatively weak, non-destructive testing must be carried out and must meet the requirements. The UT inspection must be qualified or the RT must meet the requirement of level II, and the detection method shall be carried out in accordance with the provisions of JB4730.
The shaping process
The shaping process is very important. If the shaping is not carried out well, it will inevitably lead to insufficient machining allowance for the sealing surface. The company uses a hydraulic press with 600 tons for leveling. The flange ring blank has problems such as distortion and welding deformation in the rolling and welding process. Through leveling, the flatness error of the blank can be controlled within 2 to 3 mm.
5. Heat treatment processes
The leveled ring blank should be subjected to stress relief annealing treatment. Because the slat has accumulated a lot of stress in the process of rolling, welding and leveling, the annealing treatment can release the stress and improve the crack resistance and toughness of the welding seam. In addition, the annealing treatment changes the structure of the welding seam and the heat-affected zone, strengthens the stability of the component, and improves the machining performance of the blank.
1. Cutting processes
The blanking process is the first process, which is directly related to the success or failure of manufacturing flanges. The fabrication process of the flange is shown in Figure 1.

Figure 1 The manufacturing process of the flange
1. The specific parameters of the flange are: DN being 1 000 mm, D 1 130 mm, δ 40 mm. A cutting allowance of 10 mm should be preserved in the inner and outer diameter directions of flange blanking, and a cutting allowance of 6mm should be preserved in the thickness direction.
2. Regarding the determination of the blanking length L, practice shows that L equals to the diameter of the flange times π, that is, L = π(DN + D1) / 2, and we can know that L = π (1000 + 1130) / 2 = 3345 mm.
It can be seen from this that the blanking size of the slats is L = 3 345 mm, B = 85 mm and thickness = 49 mm. The dimensions of the slat blanking are shown in Figure 2.

Figure 2 Dimensions of slat blanking
2. Rolling processes
There are two types of the rolling process, that is, cold rolling and hot rolling. The company usually adopts cold rolling with B reaching 100mm. The equipment used for rolling is a plate rolling machine, and the precision should be continuously adjusted in the rolling process to achieve the required roundness. Typically, the diametrical error does not exceed 3mm.
3. Welding processes
In the welding process, although there is only one welding junction, considering the welding deformation and welding quality, the company adopts the X-shaped groove. First, the annular blank is fixed horizontally on the gantry fixture platform, and then the groove processing is carried out. First, the groove is cut by flame and then ground with a grinder. The groove surface is required to be smooth, flat, without obvious grooves, and the groove surface and both sides are free from defects such as iron oxide, impurities, moisture, oil stains and delamination.
The selection of the appropriate welding method directly affects the degree of deformation caused by welding due to the great thickness of the blank. The company chooses manual welding for symmetrical welding on both sides. Improper welding may still cause post-weld deformation. For example, one side of the X groove is welded first, and then the other side is welded; when the first side is welded first, the structural rigidity is relatively small and the welding deformation is great. When the reverse side is welded, the previous welding has been formed, and the structural rigidity is greatly increased. The deformation caused by welding is smaller than that of the front surface. Although the deformation directions of the two are opposite, they cannot be completely offset, and the deformation direction of the first surface is still retained. The number of welding layers is determined according to the thickness of the welding workpiece and the diameter of the electrode. The workpiece has a thickness of 50mm, and it is divided into 10 layers. There are five layers on each side, and the welding adopts positive and negative symmetrical welding. Hammer the welding seam several times after each layer is welded. After the welding seam is completely cooled, remove the fixture to eliminate welding stress as much as possible.
After the welding is completed, a comprehensive RT or UT inspection shall be carried out according to the requirements of JN4700. Since the welding part is a part of the stress concentration and where the flange strength is relatively weak, non-destructive testing must be carried out and must meet the requirements. The UT inspection must be qualified or the RT must meet the requirement of level II, and the detection method shall be carried out in accordance with the provisions of JB4730.
The shaping process
The shaping process is very important. If the shaping is not carried out well, it will inevitably lead to insufficient machining allowance for the sealing surface. The company uses a hydraulic press with 600 tons for leveling. The flange ring blank has problems such as distortion and welding deformation in the rolling and welding process. Through leveling, the flatness error of the blank can be controlled within 2 to 3 mm.
5. Heat treatment processes
The leveled ring blank should be subjected to stress relief annealing treatment. Because the slat has accumulated a lot of stress in the process of rolling, welding and leveling, the annealing treatment can release the stress and improve the crack resistance and toughness of the welding seam. In addition, the annealing treatment changes the structure of the welding seam and the heat-affected zone, strengthens the stability of the component, and improves the machining performance of the blank.
Related News
- Installation of Main Bolts for Lap Joint Flange in High-Temperature Gas-Cooled Reactors
- Structural Design and Finite Element Analysis of Anchor Flanges
- Key Welding Technology for High-Neck Flange and Steel Pipe Joints
- The Design and Calculation of Stamped Lap Joint Flanges
- Development of Manufacturing Large Anchor Flanges
- Hardfacing the Inner Surface of Long-Neck Flanges Using CO₂ Gas-Shielded Welding
- UHV High-Neck Flange Welding
- Application of High-Neck Flange to UHV Steel Pipe Tower
- Analysis of the Cracking Cause of High-Neck Flanges
- Anchor Flanges for the East-West Gas Transmission Project
